> ## Documentation Index
> Fetch the complete documentation index at: https://docs.browserbase.com/llms.txt
> Use this file to discover all available pages before exploring further.
# Deploying Puppeteer on Vercel
> Learn how to set up your project, deploy to Vercel, and scale with Browserbase
This guide walks you through how to build a fully functional backend that can convert any website into HTML, take screenshots, and fill out forms using Puppeteer, Vercel, and Browserbase.
To run these at scale, you'll also use [**headless browsers**](https://docs.browserbase.com/platform/browser/getting-started/what-is-headless-browser) (browsers without a user interface), which are often used for scaling web automations, testing, and data collection.
## Prerequisites
[**Vercel**](https://vercel.com): A developer infrastructure platform that lets you build, deploy, and scale. Vercel owns & maintains Next.js, one of the most popular frontend frameworks, allowing you to build applications completely out-of-box without additional configuration.
[**Browserbase**](https://browserbase.com): A headless browser infrastructure platform that provides ready-to-use browsers out of the box. This includes observability, proxies, Verified, and additional debugging tools for your automation scripts. Browsers are essential for interacting with the web, and Browserbase simplifies this process by managing multiple browser sessions and providing debugging capabilities from the start.
[**Puppeteer**](https://pptr.dev/): A Node library that provides a high-level API to control Chrome or Chromium over the DevTools Protocol. Puppeteer runs headless by default but can be configured to run a full version of Chrome or Chromium.
## Step 1: Setting up your project
First, you'll need to create a Browserbase account. You can sign up for a free account [here](https://www.browserbase.com/sign-up).
You'll also need a Vercel account, of which you can sign up for a free account [here](https://vercel.com/signup).
Now, create a Next.js app through the CLI. This project is called `vercel-automation`.
```bash theme={null}
npx create-next-app@latest vercel-automation
```
### Install packages
Install Browserbase's Node.js SDK, [Stagehand](https://stagehand.dev) AI SDK, [Zod](https://zod.dev/) for data validation, and [Prettier](https://prettier.io/) for formatting.
```bash theme={null}
npm install @browserbasehq/sdk @browserbasehq/stagehand prettier zod
```
### Managing API keys
Be sure to add environment variables for this project.
You'll need a Browserbase API key. You can get it from the Browserbase Settings.
```bash theme={null}
BROWSERBASE_API_KEY=
```
## Step 2: Using Next.js route handlers
Next.js Route Handlers let you create custom API endpoints that process HTTP requests and return web content through APIs, directly within your application.
* Next.js provides helper classes `NextRequest` and `NextResponse` to simplify working with native [Request](https://developer.mozilla.org/docs/Web/API/Request)/[Response](https://developer.mozilla.org/docs/Web/API/Response) APIs.
* Route Handlers are exclusively available within the `app` directory.
In this project, you'll create three route handlers, each for a different web automation task.
The route handlers use Browserbase headless browser infrastructure for HTML content collection, screenshot captures, and form submissions.
Make sure you have the following directory structure:
```bash theme={null}
vercel-automation/
├── app/
│ ├── api/
│ │ ├── html/
│ │ │ └── route.ts
│ │ ├── screenshot/
│ │ │ └── route.ts
│ │ └── form/
│ │ └── route.ts
```
### HTML
Create the first route handler for retrieving HTML.
Create an `html` directory in the `app/api` folder. To create an endpoint, add a `route.ts` file that handles the API requests. Use the `GET` method to retrieve HTML content from a specified URL.
Here's the code for the first route handler:
```typescript Puppeteer [expandable] theme={null}
// app/api/html/route.ts
import { NextResponse } from "next/server";
import Browserbase from "@browserbasehq/sdk";
import puppeteer from "puppeteer-core";
import prettier from "prettier";
import htmlParser from "prettier/parser-html";
export async function GET(req: Request) {
try {
// Extract URL from request query parameters
const url = new URL(req.url).searchParams.get("url");
if (!url) {
return NextResponse.json({ error: "URL is required" }, { status: 400 });
}
// Initialize Browserbase with API key
const bb = new Browserbase({ apiKey: process.env.BROWSERBASE_API_KEY! });
// Create a new browser session with specified viewport
const session = await bb.sessions.create({
browserSettings: {
viewport: { width: 1920, height: 1080 },
},
});
// Connect to browser instance using Puppeteer
const browser = await puppeteer.connect({
browserWSEndpoint: session.connectUrl,
});
// Navigate to URL and capture HTML
const page = await browser.newPage();
await page.goto(url, { waitUntil: "domcontentloaded" });
const html = await page.evaluate(
() => document.querySelector("*")?.outerHTML
);
// Format the HTML
const formattedHtml = await prettier.format(html || "", {
parser: "html",
plugins: [htmlParser],
});
await browser.close();
// Return the HTML
return NextResponse.json({ html: formattedHtml });
} catch (error) {
console.error("HTML generation error:", error);
return NextResponse.json({
error: "Failed to generate HTML",
details: error instanceof Error ? error.message : String(error),
}, { status: 500 });
}
}
```
### Screenshots
For the second route handler, create a new browser session with a specified viewport, navigate to the URL, and screenshot the screen. Create `screenshot/route.ts` and use the following code to enable screenshot abilities.
```tsx Puppeteer [expandable] theme={null}
// app/api/screenshot/route.ts
import { NextResponse } from "next/server";
import Browserbase from "@browserbasehq/sdk";
import puppeteer from "puppeteer-core";
export async function GET(req: Request) {
try {
// Extract URL from request query parameters
const url = new URL(req.url).searchParams.get("url");
if (!url) {
return NextResponse.json({ error: "URL is required" }, { status: 400 });
}
// Initialize Browserbase with API key
const bb = new Browserbase({ apiKey: process.env.BROWSERBASE_API_KEY! });
// Create a new browser session with specified viewport
const session = await bb.sessions.create({
browserSettings: {
viewport: { width: 1920, height: 1080 },
},
});
// Connect to browser instance using Puppeteer
const browser = await puppeteer.connect({
browserWSEndpoint: session.connectUrl,
});
// Navigate to URL and capture screenshot
const page = await browser.newPage();
await page.goto(url, { waitUntil: "domcontentloaded" });
const screenshot = await page.screenshot();
await browser.close();
// Set appropriate headers for image response
const headers = new Headers();
headers.set("Content-Type", "image/png");
headers.set("Content-Length", screenshot.byteLength.toString());
// Return screenshot as binary response
return new NextResponse(Buffer.from(screenshot), { status: 200, headers });
} catch (error) {
console.error("Screenshot generation error:", error);
return NextResponse.json(
{
error: "Failed to generate screenshot",
details: error instanceof Error ? error.message : String(error),
},
{ status: 500 }
);
}
}
```
### Form inputs
Puppeteer can be a bit cumbersome for form interactions. For the Form API route handler, the example uses [Stagehand](https://stagehand.dev), an AI SDK.
[Stagehand](https://stagehand.dev) simplifies complex browser interactions by letting you use plain English. Stagehand consists of three main functions: `Act`, `Extract`, and `Observe`.
In this example, Stagehand is initialized with Browserbase credentials and an LLM model to efficiently fill out a sample form, rather than writing a more complex Puppeteer script.
Below is the same web automation task, comparing the Puppeteer and Stagehand implementations.
If you're using Stagehand, you'll need to set up an LLM provider. Be sure to include the environment variable for your LLM provider in your `.env` file.
```tsx Puppeteer [expandable] theme={null}
// app/api/form/route.ts
import { NextResponse } from "next/server";
import Browserbase from "@browserbasehq/sdk";
import puppeteer from "puppeteer-core";
export async function GET(req: Request) {
try {
// Create Browserbase session
const bb = new Browserbase({ apiKey: process.env.BROWSERBASE_API_KEY! });
const session = await bb.sessions.create({
browserSettings: { viewport: { width: 1920, height: 1080 } },
});
// Connect with Puppeteer
const browser = await puppeteer.connect({
browserWSEndpoint: session.connectUrl,
});
const page = await browser.newPage();
// Navigate to the form
await page.goto(
"https://docs.google.com/forms/d/e/1FAIpQLSdIbWu5keJxnIp4ZGmnGZNlkEd7cYnz_jBRtkE-8xLOoDo5Mw/viewform"
);
await page.waitForSelector("form", { timeout: 10000 });
// Select "Invisibility" radio button
await page.evaluate(() => {
const radio = Array.from(
document.querySelectorAll('[role="radio"]')
).find((el) => el.getAttribute("aria-label") === "Invisibility");
if (radio) (radio as HTMLElement).click();
});
// Select checkboxes for features
const features = ["Verified", "Proxies", "Session Replay"];
for (const feature of features) {
await page.evaluate((featureName) => {
const checkbox = Array.from(
document.querySelectorAll('[role="checkbox"]')
).find((el) => el.getAttribute("aria-label") === featureName);
if (checkbox) (checkbox as HTMLElement).click();
}, feature);
await new Promise((resolve) => setTimeout(resolve, 300));
}
// Fill the text field
const coolestBuild =
"A bot that automates form submissions across multiple sites.";
await page.evaluate((text) => {
// Find the first visible text input
const input = document.querySelector("input.whsOnd.zHQkBf");
if (input) {
(input as HTMLInputElement).value = text;
input.dispatchEvent(new Event("input", { bubbles: true }));
input.dispatchEvent(new Event("change", { bubbles: true }));
}
}, coolestBuild);
// Submit the form
await new Promise((resolve) => setTimeout(resolve, 300));
await page.evaluate(() => {
const submitButton = Array.from(
document.querySelectorAll('[role="button"]')
).find((el) => el.getAttribute("aria-label") === "Submit");
if (submitButton) (submitButton as HTMLElement).click();
});
// Wait for submission and close browser
await new Promise((resolve) => setTimeout(resolve, 5000));
await browser.close();
// Return success response
return NextResponse.json({
success: true,
sessionUrl: `https://browserbase.com/sessions/${session.id}`,
});
} catch (error) {
console.error("Form submission error:", error);
return NextResponse.json(
{
success: false,
error: error instanceof Error ? error.message : String(error),
},
{ status: 500 }
);
}
}
```
```tsx Stagehand [expandable] theme={null}
// app/api/form/route.ts
import { Stagehand } from "@browserbasehq/stagehand";
import { z } from "zod";
import dotenv from "dotenv";
import { NextResponse } from "next/server";
dotenv.config();
export async function GET(req: Request) {
try {
const stagehand = new Stagehand({
env: "BROWSERBASE",
});
await stagehand.init();
const page = stagehand.context.pages()[0];
const inputs = {
superpower: "Invisibility",
features_used: ["Verified", "Proxies", "Session Replay"],
coolest_build:
"A bot that automates form submissions across multiple sites.",
};
// Navigate to the form
await page.goto("https://forms.gle/f4yNQqZKBFCbCr6j7");
// You can use the observe method to find the selector with an act command to fill it in
const superpowerSelector = await stagehand.observe(
`Find the selector for the superpower field: ${inputs.superpower}`
);
console.log(superpowerSelector);
await stagehand.act(superpowerSelector[0]);
// You can also explicitly specify the action to take
await stagehand.act(
"Select the features used: " + inputs.features_used.join(", ")
);
await stagehand.act(
"Fill in the coolest_build field with the following value: " +
inputs.coolest_build
);
await stagehand.act("Click the submit button");
await page.waitForTimeout(5000);
// Extract to log the status of the form
const status = await stagehand.extract(
"Extract the status of the form",
z.object({ status: z.string() })
);
console.log(status);
await stagehand.close();
return NextResponse.json({
success: true,
formSubmission: {
inputs,
},
});
} catch (error) {
console.error("Form submission error:", error);
}
}
```
### Testing the API endpoints
Now that the three route handlers are implemented in the Next.js app, test the API endpoints.
1. Start the development server:
```bash theme={null}
npm run dev
```
2. Access the API at the base URL:
`http://localhost:3000/api`
3. Test each endpoint by navigating to:
* `http://localhost:3000/api/html`
* `http://localhost:3000/api/screenshot`
* `http://localhost:3000/api/form`
Each endpoint should return a `200` status code when working correctly.
## Step 3: Deploying to Vercel
Finally, after testing the API endpoints locally, deploy to Vercel:
1. Sign in to [Vercel](https://vercel.com)
2. Click **"Add New\..."** → **"Project"**
3. Connect and select your repository
4. Add any environment variables
5. Click **"Deploy"**
6. Once complete, you'll get a deployment URL
### Deploying with fluid compute
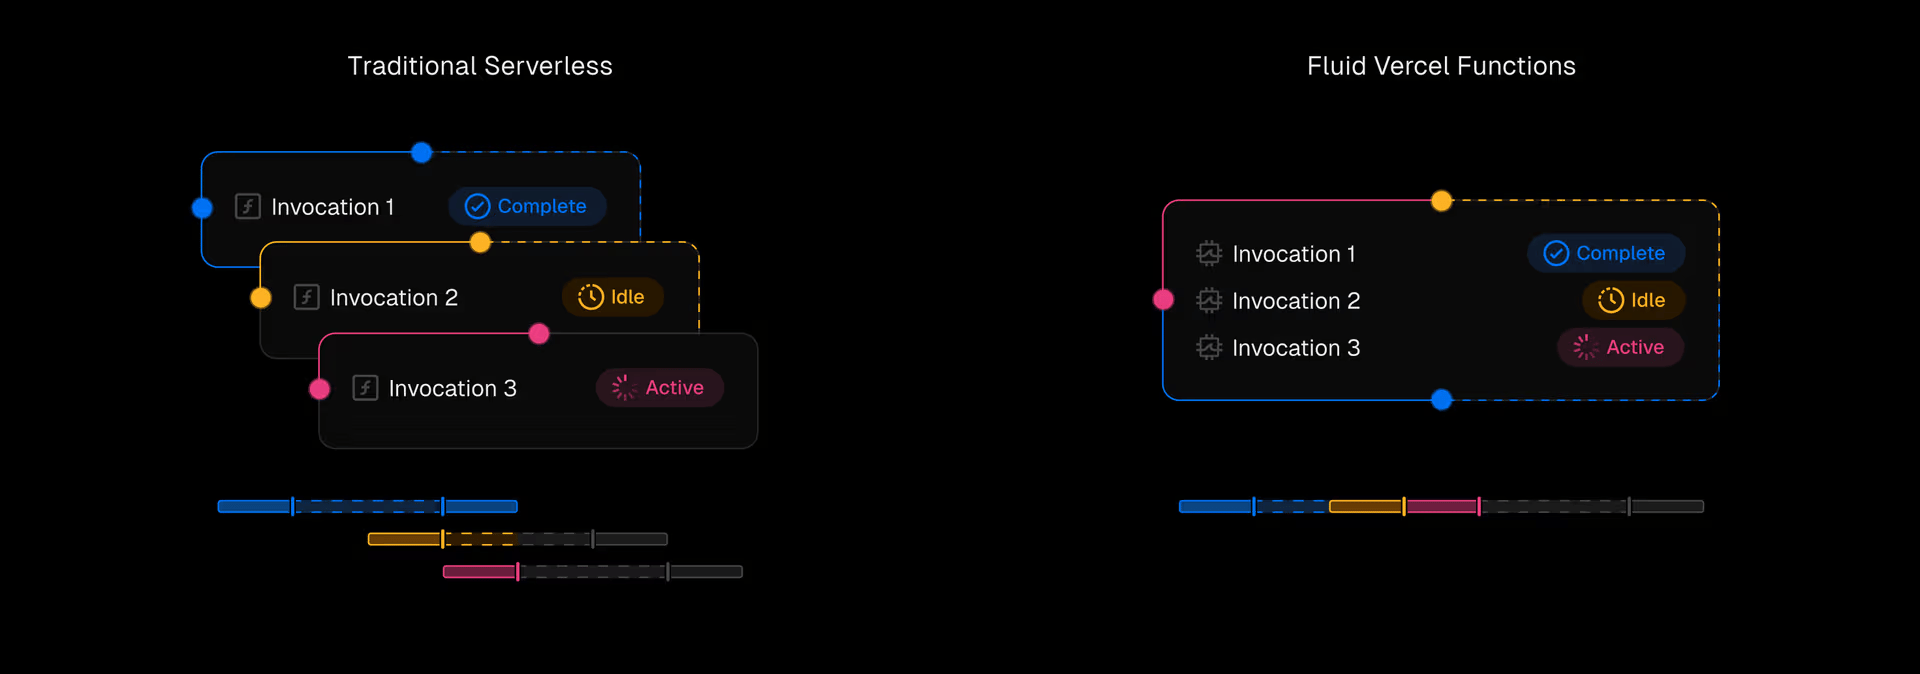 [Fluid compute](https://vercel.com/fluid) is a new infrastructure model from Vercel that balances the benefits of dedicated servers and serverless computing. These mini-servers start up only when needed, grow instantly as traffic increases, use what's already running before adding more compute. **You only pay for what you actually use**.
Fluid compute also handles advanced tasks, cuts costs, runs close to your data, requires no setup, and works with standard Node.js and Python. To learn more, you can read more about it in the [announcement](https://vercel.com/blog/introducing-fluid-compute) and [documentation](https://vercel.com/docs/functions/fluid-compute).
### Why Fluid Compute for browser automations
For your route handlers connecting to Browserbase's headless browser infrastructure, Fluid Compute offers key benefits:
* **Performance optimization** - Route handlers that orchestrate complex browser automations remain responsive under load, with warm mini-servers eliminating cold start delays when initiating browser sessions
* **Optimized concurrency** - Multiple function invocations share a single instance, allowing concurrent processing while some requests wait for Browserbase responses, eliminating idle resource waste
* **Extended, efficient runtimes** - Complex automation workflows that would timeout in standard serverless functions complete successfully, while you only pay when your route handlers are processing requests
Although Vercel doesn't handle the browser sessions directly (Browserbase does), Fluid Compute makes browser automation projects significantly more reliable, cost-effective, and performant at scale for AI applications.
### How to enable Fluid Compute
1. Go to your project settings in Vercel
2. Select **Functions** from the left navigation menu
3. Toggle the **Fluid compute** button to enable it
4. Click **Save**
5. Redeploy your project
You will see a higher New Function Duration and New Function Max Duration as a result
Fluid Compute shows how much storage and computing resources you've saved by optimizing resource usage across requests.
[Fluid compute](https://vercel.com/fluid) is a new infrastructure model from Vercel that balances the benefits of dedicated servers and serverless computing. These mini-servers start up only when needed, grow instantly as traffic increases, use what's already running before adding more compute. **You only pay for what you actually use**.
Fluid compute also handles advanced tasks, cuts costs, runs close to your data, requires no setup, and works with standard Node.js and Python. To learn more, you can read more about it in the [announcement](https://vercel.com/blog/introducing-fluid-compute) and [documentation](https://vercel.com/docs/functions/fluid-compute).
### Why Fluid Compute for browser automations
For your route handlers connecting to Browserbase's headless browser infrastructure, Fluid Compute offers key benefits:
* **Performance optimization** - Route handlers that orchestrate complex browser automations remain responsive under load, with warm mini-servers eliminating cold start delays when initiating browser sessions
* **Optimized concurrency** - Multiple function invocations share a single instance, allowing concurrent processing while some requests wait for Browserbase responses, eliminating idle resource waste
* **Extended, efficient runtimes** - Complex automation workflows that would timeout in standard serverless functions complete successfully, while you only pay when your route handlers are processing requests
Although Vercel doesn't handle the browser sessions directly (Browserbase does), Fluid Compute makes browser automation projects significantly more reliable, cost-effective, and performant at scale for AI applications.
### How to enable Fluid Compute
1. Go to your project settings in Vercel
2. Select **Functions** from the left navigation menu
3. Toggle the **Fluid compute** button to enable it
4. Click **Save**
5. Redeploy your project
You will see a higher New Function Duration and New Function Max Duration as a result
Fluid Compute shows how much storage and computing resources you've saved by optimizing resource usage across requests.
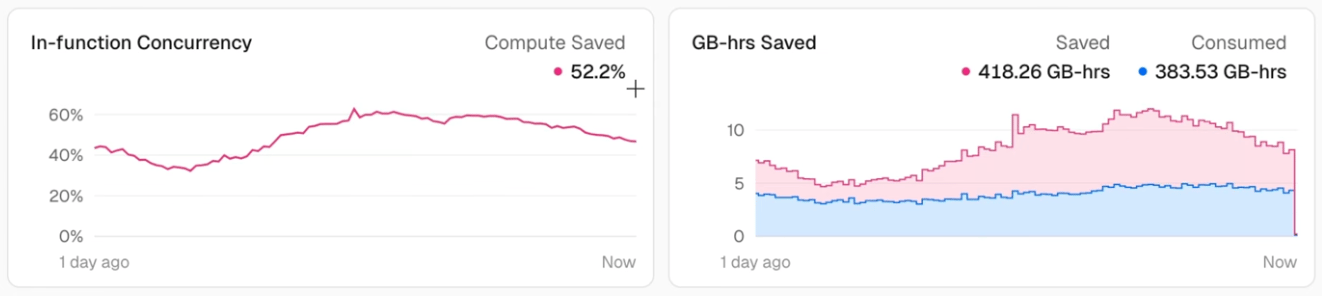 As you grow in traffic, multiple requests begin to add up. You can monitor these savings in the [Observability tab](https://vercel.com/docs/observability), which displays metrics on function performance, resource utilization, and cost efficiency.
This data helps you quantify the benefits of Fluid compute as your application scales, potentially reducing your compute costs by up to 85% compared to traditional serverless approaches.
## Conclusion
Congratulations! Now you have a fully functional web application that can convert any website into HTML, take screenshots, and fill out forms using Puppeteer and Browserbase.
This project demonstrates how to leverage Vercel's serverless functions, Next.js route handlers, Fluid Compute, Stagehand, and Browserbase headless browsers to create a practical web application.
Feel free to check out the [completed code on GitHub](https://github.com/browserbase/integrations/tree/master/examples/integrations/vercel/vercel-puppeteer).
As you grow in traffic, multiple requests begin to add up. You can monitor these savings in the [Observability tab](https://vercel.com/docs/observability), which displays metrics on function performance, resource utilization, and cost efficiency.
This data helps you quantify the benefits of Fluid compute as your application scales, potentially reducing your compute costs by up to 85% compared to traditional serverless approaches.
## Conclusion
Congratulations! Now you have a fully functional web application that can convert any website into HTML, take screenshots, and fill out forms using Puppeteer and Browserbase.
This project demonstrates how to leverage Vercel's serverless functions, Next.js route handlers, Fluid Compute, Stagehand, and Browserbase headless browsers to create a practical web application.
Feel free to check out the [completed code on GitHub](https://github.com/browserbase/integrations/tree/master/examples/integrations/vercel/vercel-puppeteer).